If you sell services to your customers, you’ll need to understand how to use QuickBooks’ time-tracking features.
Small businesses that sell products have to do a constant balancing act. Keep too much inventory on hand, and you’re sitting on potential profits. If you don’t order enough and you run out, your customers may go to a competitor. QuickBooks provides tools and reports that can help you manage this ongoing challenge.
Selling time and services is a different story. There’s no real inventory tracking involved — except in terms of knowing how much manpower you have available at any given time. But just like you wouldn’t want customers to walk off with merchandise they haven’t bought, you don’t want any billable minutes or hours to be ignored. Both scenarios eat into your profits.
Gone are the days when you had to count on employees to fill out detailed timecards and hope that they remembered to document everything. QuickBooks can help ensure that you’re getting paid for all time and services rendered.
Building Your Records
Before you can ask employees to start tracking the hours they put in, you need to create a record for every time-based activity so that QuickBooks knows how much to charge when billable time is entered. The software creates and stores these in the same way it builds records for physical inventory items.
Start by clicking on the Items & Services icon on the home page (or go to Lists | Item List). Click the down arrow next to Item in the lower left of the screen that appears, and then select New from the menu (or right-click in the main part of the screen and select New).

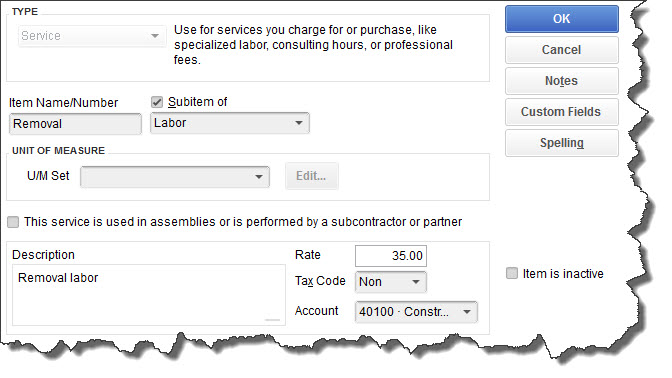
Figure 1: Once you’ve created a record for a service item, you can use it throughout QuickBooks.
A list of options will drop down under TYPE. Select Service. Type in the Item Name/Number and click in the box to the left of Subitem of if the time item should be grouped under another. In this example, the relationship is Labor/Removal (labor). U/M Set is not an option in your version of QuickBooks.
Note: If you will be working with subcontractors, let us help you set up these services. It’s a little more complicated.
Enter a description for your service and a rate, then click on the drop-down arrow and select a tax rate if appropriate (click on <Add New> to create one on the fly). Select an Account from the list. It should be some kind of income; in this case, it’s Construction Income. Ask us if you have any doubts here. Click OK when you’re done. Now this service will appear in your Item List.
Tracking Time
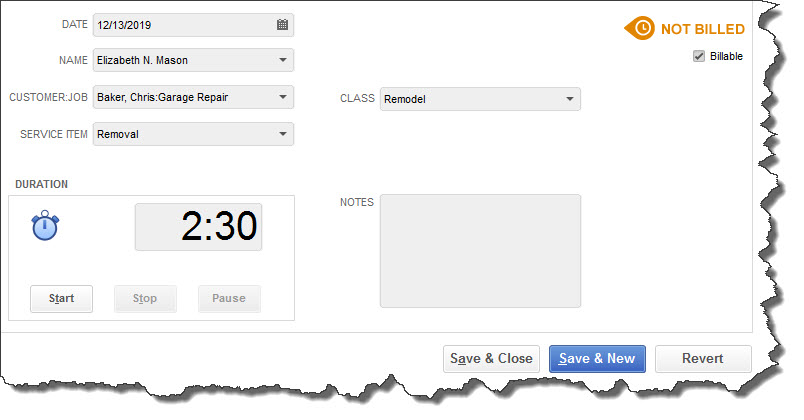
When you want to create a record for a work session, click the arrow to the right of Enter Time on the home page and select Time | Enter Single Activity (or open the Customers menu and select the same). Make sure the date for the activity is correct; you can click on the calendar and select if it’s not. Click on the arrow in the field below to select the correct employee.

Figure 2: You can either start the timer to record an activity’s duration or simply enter it in the box.
Click the arrows next to the CUSTOMER:JOB and SERVICE ITEM fields to open those drop-down menus and select the desired options. If you want to time the activity, use the Start, Stop, and Pause buttons below the duration box, or simply enter the amount of time it took. The CLASS and NOTES fields are optional.
If the time spent is billable, be sure that there’s a check in the box next to Billable in the upper right corner. If it’s not, click on the box.
Data you enter here will automatically appear on timesheets. You can enter time directly on timesheets by clicking Enter Time | Use Weekly Timesheet.
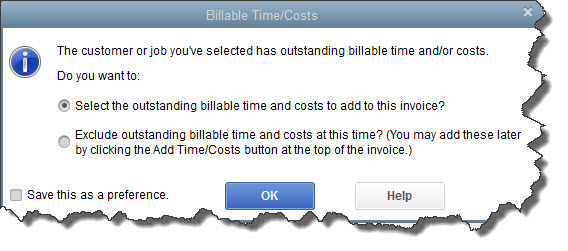
When you start an invoice for a customer who has accumulated billable time, you’ll see this message:

Make sure that your employees understand the importance of documenting every billable minute. Lost time can eat into profits, and that has an impact on everyone in the company.
