Unused features, navigational aids, and display columns can slow you down. Accelerate your workflow with some modifications to shape QuickBooks POS to reflect your workflow.
You’ve experienced it before: software that is capable of doing much more than you need. With an application like word processing, you learn to ignore the extra features.
But when you have a line of customers waiting to check out, you want that process to proceed as quickly as possible. One way to accomplish that is by modifying QuickBooks Point of Sale, picking up where the Setup Interview leaves off. (Any actions you take to reduce the excess are, of course, reversible.)
Here are some suggestions for streamlining QuickBooks POS:
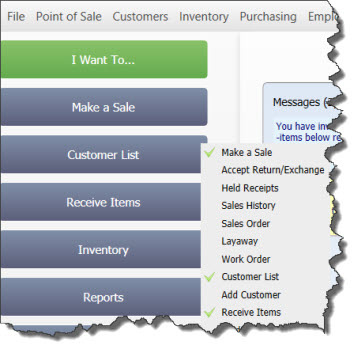
Display only your most commonly used navigational buttons. To modify the I Want To… toolbar on the left, right-click within any of the action buttons and select Customize columns. The list of available choices appears. Simply check and uncheck options to include only those necessary for you.

Edit your list of navigational buttons to speed up transactions.
After the column content and layout in lists. To change your Item, Customer, Sales History, or Receiving History lists, right-click in the field label row and select Customize columns. Check or uncheck labels to modify the table’s content. To change the width of a column, mouse over the vertical line next to the label until a bi-directional arrow appears. Click and slide to reduce or expand it. You can also drag and drop column labels to change their display order. For all other lists, right-click within the field label row and choose from the option presented. These alterations will not be duplicated in reports; you must customize them individually.
Don’t display tools you don’t use. Go to File | Preferences | Company | General. In the Select Features to Use box, check and uncheck options to turn them on or off. If you are a multi-store operation, this can only be done by the administrator at the primary location.
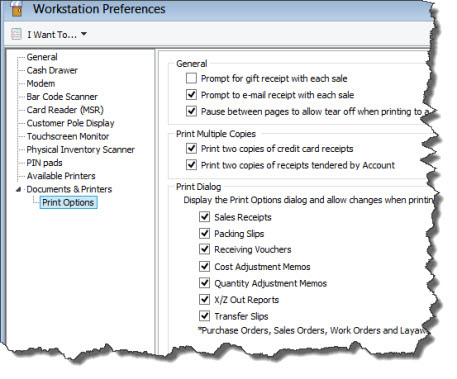
Customize workstation preferences. QuickBooks Point of Sale does let you personalize options for individual workstations. Go to File | Preferences | Workstation to establish settings for things like hardware, printing, and automatic updating.

These Print Options are available for individual workstations in QuickBooks Point of Sale.
Change the display configuration of list information panels. Open a Customer List, for example, and double-click on an entry to open the Customer Detail box. Depending on the Point of Sale version you’re using, you’ll either click the Customize This window link in the lower right or right-click the Customize panel order.
Create your own custom fields. Your retail operation probably offers items in different sizes, colors, materials, etc. QuickBooks Point of Sale lets you name your own fields for these variations. Go to File | Preferences | General | My Field Labels, where you can enter new field names for customers, vendors, employees, and inventory records. Click in the box next to one and type in your own, then Save when you’re done. Your fields will appear in the Detail windows.
Many QuickBooks POS customization options are fairly straightforward and easy to understand. But not all. You have to be especially careful if you’re making global changes. There are often differences between what you see on the screen and what appears in reports and on printed forms and documents. We can help you set up QuickBooks POS so that it does what you want – and no more.
